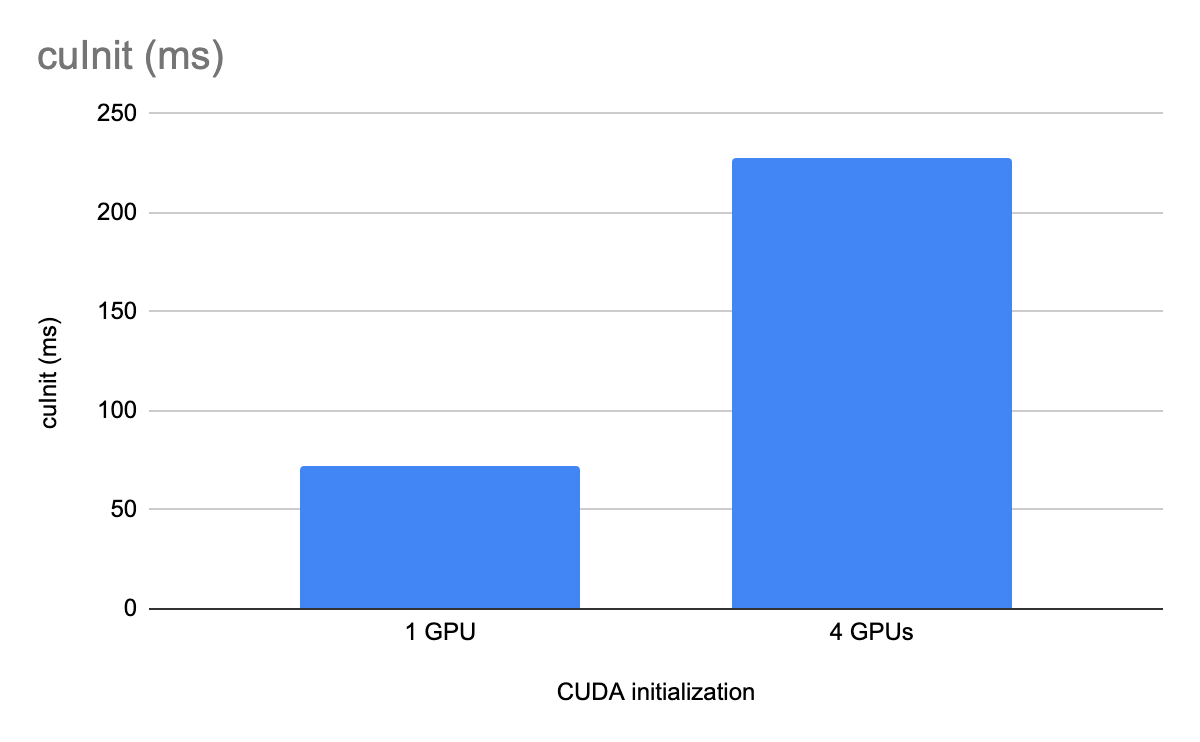
在多 GPU 平臺上運行的許多 CUDA 應用程序通常使用單個 GPU 來滿足其計算需求。在這種情況下,應用程序會支付性能損失,因為 CUDA 必須枚舉/初始化系統上的所有 GPU.如果 CUDA 應用程序不需要其他 GPU 可見和可訪問,您可以通過將不需要的 GPU 與 CUDA 進程隔離并消除不必要的初始化步驟來啟動此類應用程序。
本文將討論實現此目標的各種方法及其性能優勢。
GPU 隔離
在 Linux 系統上,可以使用 Linux 工具(如cgroups.在本節中,我們首先討論低級方法,然后討論更高級別的可能方法。
CUDA 提供的用于隔離設備的另一種方法是使用CUDA_VISIBLE_DEVICES雖然在功能上類似,但相較于 NVIDIA Omniverse 的cgroups方法。
使用 cgroups V1 隔離 GPU
控制組提供了一種機制,用于將任務集及其未來的子集聚合或劃分到具有專門行為的分層組中。您可以使用cgroups來控制 CUDA 進程可見的 GPU.這可確保僅向其提供 CUDA 進程所需的 GPU.
以下代碼提供了一個低級示例,說明如何使用cgroups并將 GPU 完全隔離到單個進程中。請注意,您可能必須在 root shell 中運行這些命令才能正常工作。我們稍后將在本文中展示一個更方便、更高級別的實用程序。
# Create a mountpoint for the cgroup hierarchy as root$> cd /mnt$> mkdir cgroupV1Device# Use mount command to mount the hierarchy and attach the device subsystem to it$> mount -t cgroup -o devices devices cgroupV1Device$> cd cgroupV1Device# Now create a gpu subgroup directory to restrict/allow GPU access$> mkdir gpugroup$> cd gpugroup# in the gpugroup, you will see many cgroupfs files, the ones that interest us are tasks, device.deny and device.allow$> ls gpugrouptasks devices.deny devices.allow# Launch a shell from where the CUDA process will be executed. Gets the shells PID$> echo $$# Write this PID into the tasks files in the gpugroups folder$> echo <PID> tasks# List the device numbers of nvidia devices with the ls command$> ls -l /dev/nvidia*crw-rw-rw- 1 root root 195, 0 Jul 11 14:28 /dev/nvidia0crw-rw-rw- 1 root root 195, 0 Jul 11 14:28 /dev/nvidia1# Assuming that you only want to allow the CUDA process to access GPU0, you deny the CUDA process access to GPU1 by writing the following command to devices.deny$> echo 'c 195:1 rmw' > devices.deny# Now GPU1 will not be visible to The CUDA process that you launch from the second shell.# To provide the CUDA process access to GPU1, we should write the following to devices.allow$> echo 'c 195:1 rmw' > devices.allow |
完成任務后,請卸載/cgroupV1Device文件夾和 umount 命令。
umount /mnt/cgroupV1Device |
要允許或拒絕用戶訪問系統上的任何其他 GPU,請將這些 GPU 編號寫入適當的文件中。以下是拒絕在多 GPU 系統上僅訪問 GPU5 和 GPU6 的示例。
在/gpugroup將先前創建的文件夾寫入要啟動 CUDA 進程的 shell 的 PID,tasks文件:
$> echo <PID> tasks |
現在,將 GPU5 和 GPU6 添加到拒絕列表中:
$> echo 'c 195:5 rmw' > devices.deny$> echo 'c 195:6 rmw' > devices.deny |
此時,CUDA 進程無法看到或訪問這兩個 GPU.若要僅為 CUDA 進程啟用特定 GPU,則應將這些 GPU 添加到devices.allow應將文件和 GPU 的其余部分添加到devices.deny文件。
訪問控制適用于每個進程。多個進程可以添加到tasks將相同的控制傳播到多個進程的文件。
使用 bubblewrap 實用程序隔離 GPU
Bubblewrap 實用程序 (bwrap) 是一個更高級別的實用程序,可用于 Linux 操作系統中的沙箱和訪問控制,可用于實現與之前提供的解決方案相同的效果。您可以使用此工具輕松限制或允許從 CUDA 進程訪問特定 GPU:
# install bubblewrap utility on Debian-like systems$>sudo apt-get install -y bubblewrap# create a simple shell script that uses bubblewap for binding the required GPU to the launched process#!/bin/sh# bwrap.shGPU=$1;shift # 0, 1, 2, 3, ..if [ "$GPU" = "" ]; then echo "missing arg: gpu id"; exit 1; fibwrap \ --bind / / \ --dev /dev --dev-bind /dev/nvidiactl /dev/nvidiactl --dev-bind /dev/nvidia-uvm /dev/nvidia-uvm \ --dev-bind /dev/nvidia$GPU /dev/nvidia$GPU \ "$@"# Launch the CUDA process with the bubblewrap utility to only allow access to a specific GPU while running$> ./bwrap.sh 0 ./test_cuda_app <args> |
通過擴展 CUDA 進程,多個 GPU 可用于 CUDA 進程dev-bind代碼示例中的選項。
GPU 隔離的性能優勢
在本節中,我們比較了 CUDA 驅動程序初始化 API (cuInit) 的性能(經過 256 次迭代測量,具有和不具有 GPU 隔離)。這些 API 在具有四個 A100 類 GPU 的 x86 計算機上運行。

總結
GPU 隔離cgroups在系統上的所有 GPU 都無需由給定 CUDA 進程使用的有限用例中,您可以選擇縮短 CUDA 初始化時間。
有關更多信息,請參閱以下資源:
?


