The first post in this series, Path Tracing Optimization in Indiana Jones?: Shader Execution Reordering and Live State Reductions, covered ray-gen shader level optimizations that sped up the main path-tracing pass (“TraceMain”) of Indiana Jones and the Great Circle?.
This second blog post covers additional GPU optimizations that were made at the level of the ray-tracing acceleration structures in the path tracing mode of the game, for the vegetation-heavy scenes:
- Using Opacity MicroMaps (OMMs) to reduce the GPU time spent ray-tracing alpha-tested objects such as vegetation models, from 7.90 to 3.58 ms on the TraceMain pass on an NVIDIA GeForce RTX 5080 GPU.
- Compacting the Bottom-Level Acceleration Structures (BLASs) of the dynamic vegetation models to reduce the required VRAM size from 1027 to 606 MB across all BLASs.
The profiled scene

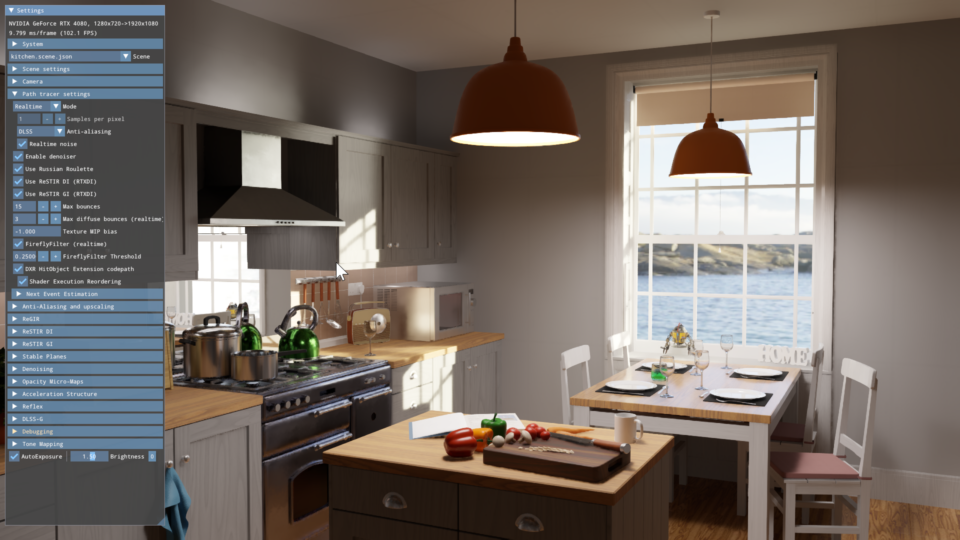
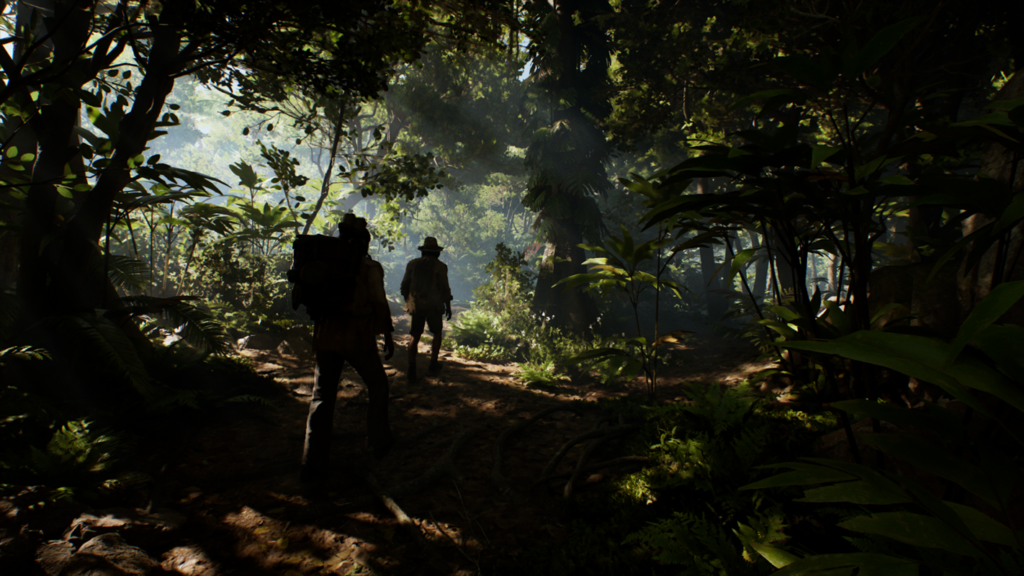
All of the data in this post is captured from the Peru scene shown on Figure 1, on a GeForce RTX 5080 GPU, with the graphics settings in Table 1 and the Shader Execution Reordering (SER) optimizations from the Shader Execution Reordering and Live State Reductions post. In this case (4K UHD with DLSS-RR Performance), the path-tracing is done in 1080p.
| Setting | Value |
| Output Resolution | 4K UHD (3840 x 2160) |
| DLSS Mode | DLSS Ray Reconstruction, Performance Mode |
| Graphics Preset | High |
| Path-Tracing Mode | Full Ray Tracing |
| Ray-Traced Lights | All Lights |
| Vegetation Animation Quality | Ultra |
In this scene, the Ray Tracing Acceleration Structure (RTAS) contains 26.9M triangles, according to the Nsight Graphics RT Inspector.
Alpha testing in RT shaders
To be able to path-trace all the alpha-tested geometry in the game, we started by implementing basic alpha-testing support in the path-tracing code. The non-path-tracing version of the game kept ray-traced alpha-testing support disabled for performance reasons.
In the TraceMain pass, the ray-tracing is done using a GLSL traceRay call from a ray-generation (RayGen) shader, and alpha-testing is implemented using Any-Hit Shaders (AHS). That AHS shader fetches texture LOD 0 from the current alpha texture. It then calls ignoreIntersectionEXT if the hit should be ignored.
For the shadow rays, we used a rayQueryEXT object. We could not use a RayGen shader because some of these rays had to be traced within fragment shaders due to the engine doing Forward+ rendering. The body of the rayQueryProceed loop uses the offset from rayQueryGetIntersectionInstanceShaderBindingTableRecordOffsetEXT for fetching a buffer that contains covermap-texture indices. It then calls rayQueryConfirmIntersectionEXT only if the alpha-test should not reject the hit.
Initial GPU performance
On a GeForce RTX 5080 GPU, with this initial implementation, the TraceMain pass looked like Figure 2 in the Nsight Graphics GPU Trace Profiler.
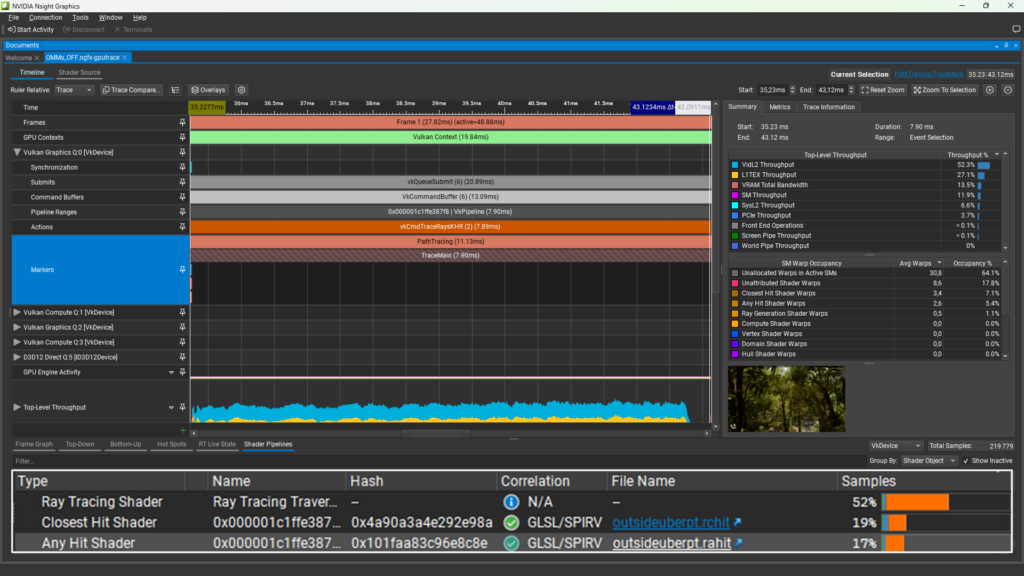
Figure 2 shows that the TraceMain pass took 7.90 ms and had 17% of the periodic shader samples spent in the AHS. The only thing this AHS is doing is alpha testing. In reality, the overhead of doing alpha-testing in an AHS is greater than just the time spent executing the AHS itself, because of the overhead of switching between the traversal and the AHS evaluations. For more information, see the NVIDIA Ada GPU Architecture whitepaper.
To speed up the alpha testing in our path-tracing passes, we added Opacity MicroMaps, using VK_EXT_opacity_micromap.
With Opacity MicroMaps
Opacity MicroMaps let the GPU reduce the number of AHS invocations by precalculating an opacity state for micro-triangles, classifying them as one of the following states:
- Opaque
- Unknown Opaque
- Unknown Transparent
- Transparent
If the state is either of the two unknown states, the opacity state of the micro-triangle is determined by the AHS or RayQuery object as usual.
For shadow rays, we used the four-state OMMs, which are fully conservative.
For indirect lighting rays, we used the gl_RayFlagsForceOpacityMicromap2StateEXT flag, which makes the RTCore unit use a two-state approximate version of the OMM for tracing. This approximation was good enough for the indirect lighting and let us fully avoid evaluating alpha testing in shaders for the BLASs that had OMMs.
In the scene from Figure 1, enabling OMMs for most of the alpha-tested models produced a 55% reduction in GPU times in the SharcUpdate and the TraceMain passes of the path tracer, where SharcUpdate does up to four bounces to update the SHARC radiance cache, and TraceMain does up to two bounces and reuses the SHARC cached results. The GPU time spent in the SunTracing pass has also been sped up, by 14%.
| GPU Times | OMMs OFF | OMMs ON | Delta |
SharcUpdate | 1.99 ms | 0.89 ms | -55% |
TraceMain | 7.90 ms | 3.58 ms | -55% |
SunTracing | 0.83 ms | 0.71 ms | -14% |
Looking with the Nsight Graphics GPU Trace Profiler at the DispatchRays passes shows that the number of periodic samples spent in AHS has been reduced and the deltas are in the same ballpark as the GPU-time deltas.
| Samples | OMMs OFF | OMMs ON | Delta |
SharcUpdate | 4.37K (12%) | 1.79K (3%) | -59% |
TraceMain | 37.5K (17%) | 12.2K (3%) | -67% |
We built all our OMMs using the VK_BUILD_MICROMAP_PREFER_FAST_TRACE flag, which produced a 5% GPU-time reduction on the TraceMain pass, with a marginal slowdown on the BLAS updates.
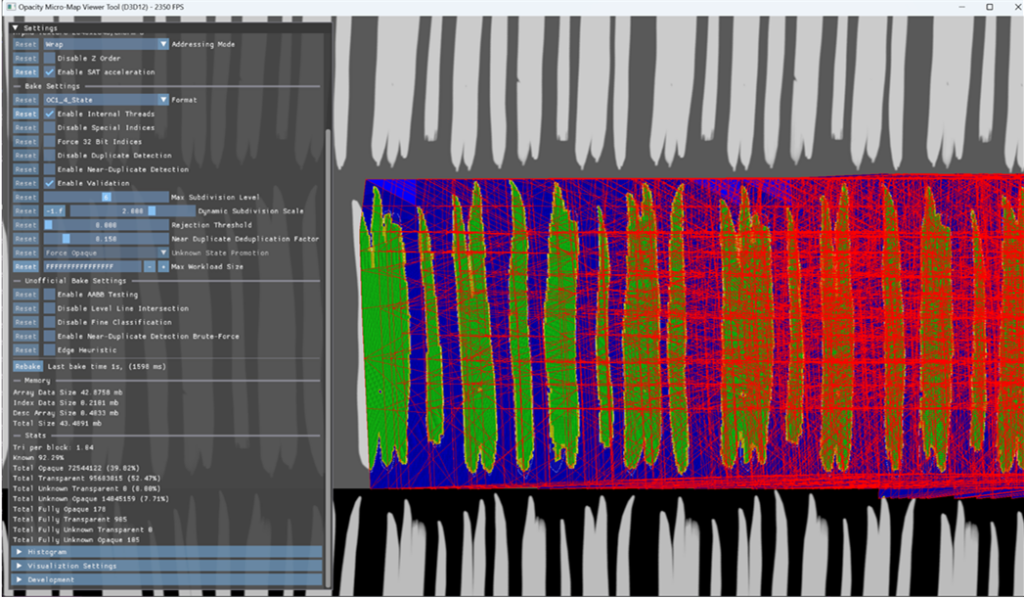
Baking the OMMs
We integrated the OMM SDK and baked all the OMMs on the CPU for most of the static models of the game that have covermaps, or alpha textures. This includes all the vegetation but also all of the other static alpha-tested models, such as fences, cloth, containers, tents, and more.
Initially, the OMM baking was done on the developer workstations, but it was slow and we moved all of the cooking process to happen in the offline cooker. The cooker ran after artists submitted their mesh or covermap changes. On a regular basis, the OMMs were pushed into Perforce along with the other cooked data.
Here are the parameters we used for baking the OMMs. We cooked all the OMMs in the four-state format, and tweaked the subdivision parameters to reach a good tradeoff between VRAM size and efficiency:
ommFormat_OC1_4_StateommUnknownStatePromotion_ForceOpaquemaxSubdivisionLevel: 6dynamicSubdivisionScale: 2.0
While baking all of the OMMs of the game, we hit an unexpected problem: a minority of the OMMs took more than 30 minutes to be baked, sometimes hours. In these cases, the inputs to the OMM baker (UVs and alpha maps) had nothing wrong. It was just that the complexity of the UV-triangles or the alpha maps made the baking process longer than usual.
If the GPU baking path of the OMM SDK had been used, this time would have been much reduced, but that was not possible because the cooking machines didn’t have GPUs and that couldn’t be changed at the time the OMMs were added.
To work around that, we used the following OMM SDK parameters to make the OMM baker skip the OMMs that would have taken too long to be baked on the CPU:
bakeFlags: ommCpuBakeFlags_EnableWorkloadValidationmaxWorkloadSize: 1ull << 32
The baking time is proportional to the number of texels covered by micro-triangles. This is the workload size. This in turn is a function of triangle count, texture resolution, subdivision scale, and UV coordinates. The OMM baker emits warning messages when the workload validation flag is enabled, which can help tweak the maxWorkloadSize threshold.
Here is an example of such a warning for a complex vegetation model:
[Perf Warning] - The workload consists of 869,002,294 work items (number of texels to classify), which corresponds to roughly 828 1024x1024 textures. |
For Figures 3 and 4, the X axis is the OMM index.

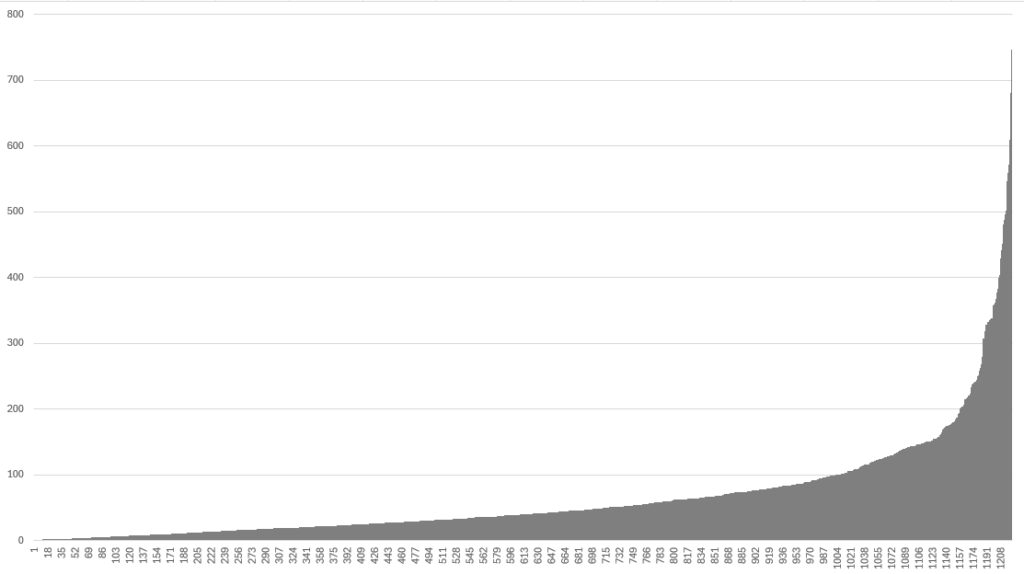
The histograms from Figures 3 and 4 show that, for the Peru map and with the OMM workload validation flag enabled, 95% of the OMMs took less than 1 second to be generated and occupied less than 200 kB per OMM. For this study, the OMMs were rebaked locally, with multi-threaded resource generation disabled in the engine.
Later on, we realized we had another problem: a few OMMs were taking a large amount of VRAM. For instance, one of them was taking 43 MB of VRAM on its own (Figure 5). Again, there was nothing wrong with the OMM baker inputs, it was just that the complexity of the UVs with UV wrapping, and the complexity of the covermap caused the resulting OMM to be huge.
OMMs are more memory efficient when there is UV-triangle reuse, such as a leaf on a tree being instanced many times over. In this case, there was almost no overlap or possible reuse identified by the baker, leading to more than 55K unique entries in the OMM data array.
As a last-minute workaround, we implemented an additional step that skipped all of the OMMs that would have taken more than 0.5 MB of VRAM. Most of the OMMs were under that threshold. In the end, all the OMMs per map during gameplay did fit within a 128-MB VRAM budget.
Release 1.7.0 of the OMM SDK added an alternative solution to keep the OMM output size under a certain VRAM budget per OMM. The following code shows this new parameter of the OMM CPU baker:
// Max allowed size in bytes of ommCpuBakeResultDesc::arrayData// The baker will choose to downsample the most appropriate omm blocks (based on area, reuse, coverage and other factors) until this limit is metuint32_t maxArrayDataSize; |
Verifying OMM presence
We implemented a path-tracing debug mode that visualizes the result of ray-tracing primary rays, with different debug colors depending on whether a RayQuery loop had to perform multiple iterations. Primary rays for which the loop has iterated only one time could do their full ray traversal in the RTCore hardware unit and were displayed in green. The other rays were displayed in purple. Some pixels were also displayed in blue and can be ignored in this context.
To verify that all BLASs that were supposed to have OMMs actually had OMMs, we found it useful to combine this debug mode with forcing the gl_RayFlagsForceOpacityMicromap2StateEXT ray flag and checking all models that had purple pixels in various areas of the game. We even requested a QA pass with this mode, asking for areas of the game that had purple pixels in this mode to be reported.
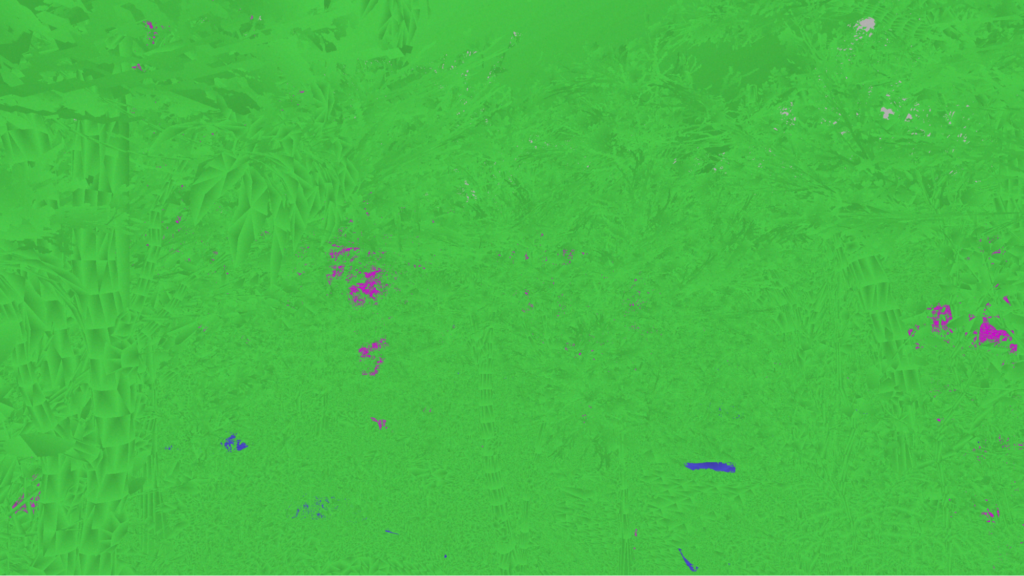
Figure 6 uses this debug view with forced-2-state OMMs on the same scene as Figure 1. There were a couple trees that lacked OMMs, most likely due to the cooked OMMs having been dropped by the aforementioned max size per OMM, but most trees did have OMMs.
Compacting dynamic BLASs
Typically, BLAS compaction is used only for the BLASs that are built one time, compacted and then never rebuilt nor updated. However, BLAS compaction also works just fine for the BLASs that are built, compacted and then updated or refitted after.
The only constraint for a BLAS to be compatible with BLAS compaction is that this BLAS should not be rebuilt after it got compacted. The reason for that is that the compacted size for a BLAS might be different after a rebuild.
It turned out that the BLASs of the dynamic vegetation models of the game never needed to be rebuilt, so they were compatible with BLAS compaction and we used it for them too. Normally, it is a good practice to periodically rebuild BLASs for dynamic geometry, but the dynamic vegetation is waving in the wind and being deformed under the character’s feet, and always goes back to its initial position at some point. As a result, periodically rebuilding the BLASs for the dynamic vegetation was not necessary to keep the quality of the BLAS high.
Dynamic-BLAS compaction was enabled in the game for all the dynamic-vegetation models. In the scene from Figure 1, doing so has made the VRAM allocated for all BLASs go from 1027 to 606 MB, a 41% saving, on NVIDIA RTX 5080 GPUs.
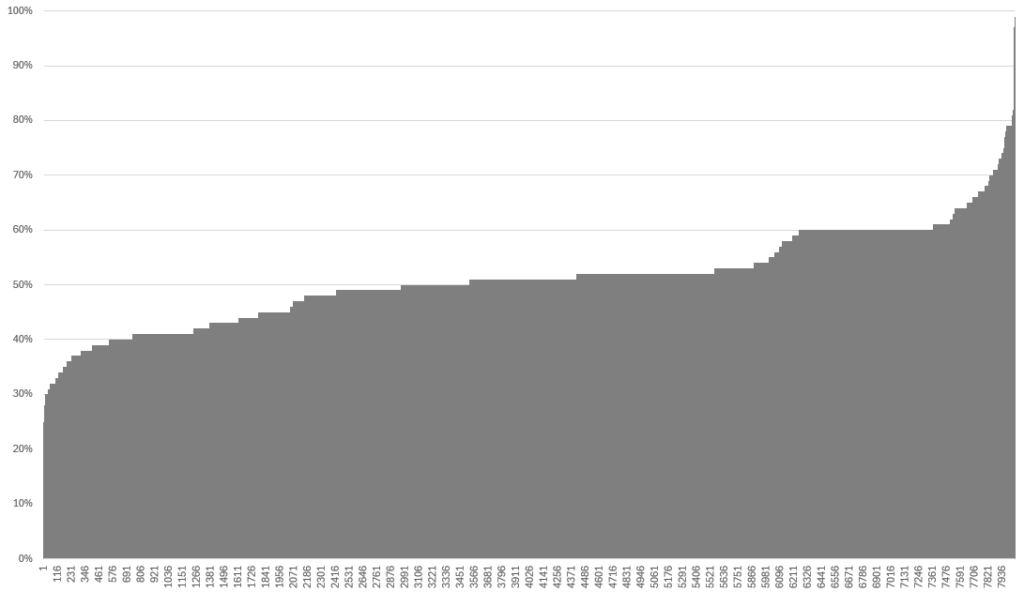
Figure 7 shows the BLAS VRAM savings from dynamic BLAS compaction on a per-BLAS basis on an NVIDIA RTX 5080 GPU. The X axis is the BLAS index, and the Y axis is the compacted VRAM size, as a percentage of the original BLAS size. Typically, the compacted BLASs were 50% the size of the original BLASs.
For the record, all the BLASs with dynamic-BLAS compaction had the following BLAS build flags: PREFER_FAST_BUILD | ALLOW_UPDATE | ALLOW_COMPACTION.
Conclusion
Opacity MicroMaps (OMMs) are an effective way to speedup traceRay calls or rayQuery objects in scenes with alpha-tested materials. OMMs let the hardware avoid calling the Any Hit Shaders or the equivalent shader code in rayQuery loops, at the RTCore unit level. OMMs are accelerated in hardware in the RTCore unit on the GeForce RTX 40 and 50 series. In DX12 applications, they are exposed with DXR 1.2 or through NVAPI.
BLAS compaction is compatible with BLASs of dynamic geometry, as long as the BLAS is updated or refitted and never rebuilt after its initial build. Compacting all the BLASs of the dynamic-vegetation models has been critical for letting Indiana Jones and Great Circle be playable with uncompromised path-tracing quality on 12-GB GPUs, reducing the total amount of VRAM needed for BLASs in Peru jungle scenes from 1027 to 606 MB.
Both optimizations have shipped in the initial release of the game with path tracing.
The first post, Shader Execution Reordering and Live State Reductions, covered ray-gen shader level optimizations that made the main path-tracing pass (TraceMain) 25% cheaper on the GPU in the intro scene of Indiana Jones and the Great Circle.
Acknowledgements
We’d like to thank all the people from NVIDIA and MachineGames who made it possible to ship Indiana Jones and the Great Circle? with path tracing on December 9, 2024.
MachineGames: Sergei Kulikov, Andreas Larsson, Marcus Buretorp, Joel de Vahl, Nikita Druzhinin, Patrik Willbo, Markus ?lind, Magnus Auvinen, Jim Kjellin, Truls Bengtsson, Jorge Luna (MPG).
NVIDIA: Ivan Povarov, Juho Marttila, Jussi Rasanen, Jiho Choi, Oleg Arutiunian, Dmitrii Zhdan, Evgeny Makarov, Johannes Deligiannis, Fedor Gatov, Vladimir Mulabaev, Dajuan Mcdaniel, Dean Bent, Jon Story, Eric Reichley, Magnus Andersson, Pierre Moreau, Rasmus Barringer, Michael Haidl, and Martin Stich.