
所以,您現在有大量的數據管道,并且正在考慮使用NVIDIA Base Command Platform進行集成。那么,您應該采取哪些步驟?使用工作流管理將NVIDIA Base Command進入您現有的管道。
工作流管理器使您能夠輕松管理管道,并連接到 Base Command 以利用 NVIDIA 計算能力。此示例使用 Apache Airflow,擁有豐富的開源社區,構建良好,并被廣泛采用。
什么是工作流管理,為什么它很重要?
工作流管理使您能夠連接和管理管道中的所有任務。它通過創建、記錄和監控完成必要任務所需的所有步驟來實現這一點。它通過確保正確高效地完成所有工作來簡化您的工作流程。
一個企業通常有一個 BizOps 團隊、 MLOps 團隊和 DevOps 團隊,負責完成各種任務以達到給定的目標。對于一個簡單的工作流程,許多人完成各種任務,有些人相互關聯或依賴,而另一些人則完全獨立。工作流管理可以為實現最終結果提供寶貴的支持,特別是在復雜的情況下。
為了提供一個類比,想象一下你在你最喜歡的壽司店,你下了一份你最喜歡卷的訂單。在廚房里,有幾個廚師在做各種各樣的工作來準備你的壽司。一個是準備魚,下一個是仔細切蔬菜,第三個是做米飯(烹飪、洗滌、調味),第四個是在明火上烤意大利面。
只有在每位廚師完成任務后,壽司大師才能組裝壽司卷。在這里,我們看到了具有不同專業知識的多個角色,需要完成各種任務才能完成最終目標。
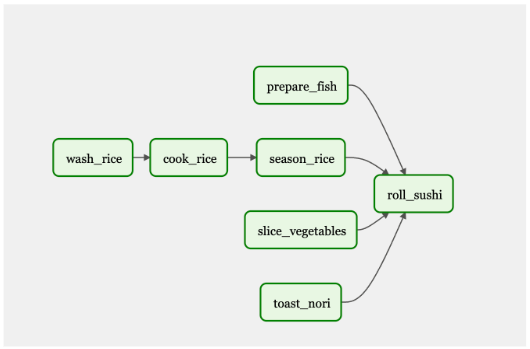
如果壽司店提供 50 種不同的菜單項,那么至少會有 50 種不同工作流程。圖 2 顯示了一個僅包含幾個菜單項的工作流。
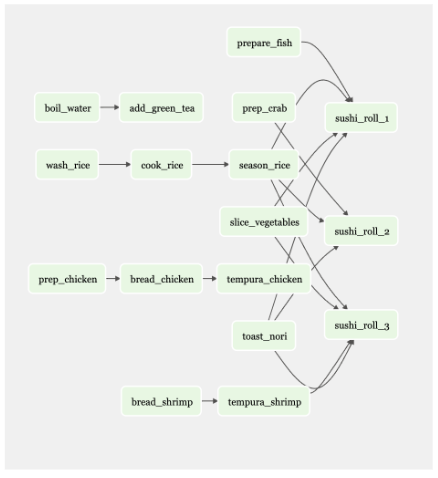
現在想想一個有 20 家餐廳的餐廳,每家餐廳都有自己的菜單和工作流程。
你可以看到這種情況對一個人來說是多么的困難。數字工具有助于組織和執行復雜的任務,比如 Apache Airflow。
如果您需要在添加新步驟的同時維護當前流程,則工作流管理是關鍵。管理工作流程是一個既定的問題,隨著人工智能應用的加速,很明顯,將人工智能任務和結果納入現有工作流程將成為下一個挑戰。
阿帕奇氣流
將人工智能作為部署應用程序的更大工作流程的一部分意味著什么? 2015 年, Airbnb 在管理其復雜的數據管道時遇到困難,因此他們創建了 Airflow 。在進行市場調查后,他們發現大多數人都在使用 cron 調度器或內部工作流工具。這些工具不是很復雜,也沒有預見到未來的需求。它們是“邊走邊編”的工具。
氣流具有可擴展性和動態性。它于 2016 年開源,并成為 Apache 基金會的一部分。這使得 Airflow 越來越受歡迎,并帶來了豐富的開源社區。
NVIDIA 基地指揮平臺
NVIDIA Base Command Platform 是一個人工智能培訓平臺,可以幫助企業和科學家加快人工智能的發展。使用 NVIDIA Base Command,您可以利用 NVIDIA GPU 加速 AI 的訓練。NVIDIA Base Command 與 NVIDIA 加速的人工智能基礎設施相結合,提供了一個云托管解決方案,可以避免您部署和運行自己的平臺所帶來的開銷和陷阱。
NVIDIA Base Command 可以高效地配置和管理人工智能工作負載,提供集成的數據集管理,并在從單個 GPU 到大規模多節點集群的各種資源上執行它們。
Apache Airflow 加上 NVIDIA Base 指揮平臺
擁有像 Apache Airflow 這樣的工具來安排和運行作業,以及監控作業的進度,有助于簡化模型培訓過程。此外,一旦模型經過訓練并準備好投入生產,您就可以使用 Airflow 從基本指揮平臺獲得結果,并將其用于NVIDIA Fleet Command用于生產。Airflow 穿過平臺,使端到端管道更易于操作。通過工作流管理工具,將具有基本命令的人工智能添加到新的或現有的管道中變得更容易。
MLOP 的主要氣流特性
Airflow 是一個流行的、成熟的工具,擁有龐大的用戶群體。許多公司已經在使用它,而且資源豐富。它是開源的,也是最早為人所知的工作流管理工具之一。 Cron 調度器有自己的位置,但當作業失敗時,很難管理管道。當另一個作業依賴于失敗任務的輸出時,工作流工具(如 Airflow )有助于解決依賴關系。
工作流管理工具具有更多功能;例如,在任務/作業失敗時向團隊成員發出警報,以便有人可以修復它并重新運行作業。應用工作流管理工具可以使工作流中的許多人受益,包括從事 ETL 工作的數據工程師、從事模型培訓工作的數據科學家、從事報告工作的分析師等等。
任務和 DAG
氣流使用有向非循環圖( DAG )來運行工作流。 DAG 內置于 Python 中。您設置了任務和依賴項, Airflow 將返回一個描述工作流的圖形。一旦完全滿足作業的依賴性,氣流就會觸發作業運行。
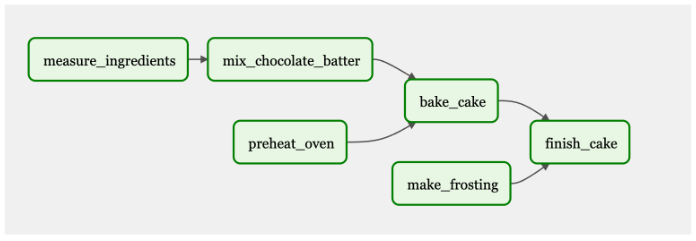
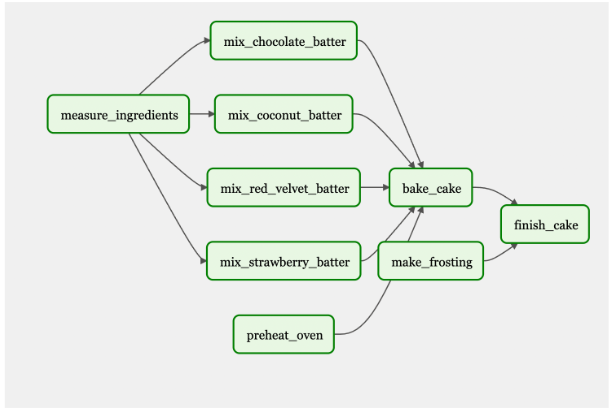
圖 4 顯示了用于烘焙和冷凍蛋糕的 DAG 工作流程。有些任務是依賴的,比如測量和混合配料,以烘焙蛋糕。其他任務,如“預熱烤箱”,是完成最終目標所必需的:一個糖霜蛋糕。一切都需要連接起來才能完成最終產品。
在這個 DAG 中,“測量配料”、“預熱烤箱”和“制作糖霜”將首先觸發并執行。當這些任務完成后,接下來的步驟將根據它們的依賴關系運行。
氣流 UI
氣流 UI 直觀易用。它可以用來觸發 DAG ,以及監視任務和 DAG 的進度。您還可以查看日志,這些日志可用于故障排除。
動態作業
動態作業使您能夠運行相同的作業,同時更改一些參數。這些作業將并行運行,您可以添加變量,而不是多次對同一個作業進行微小更改。
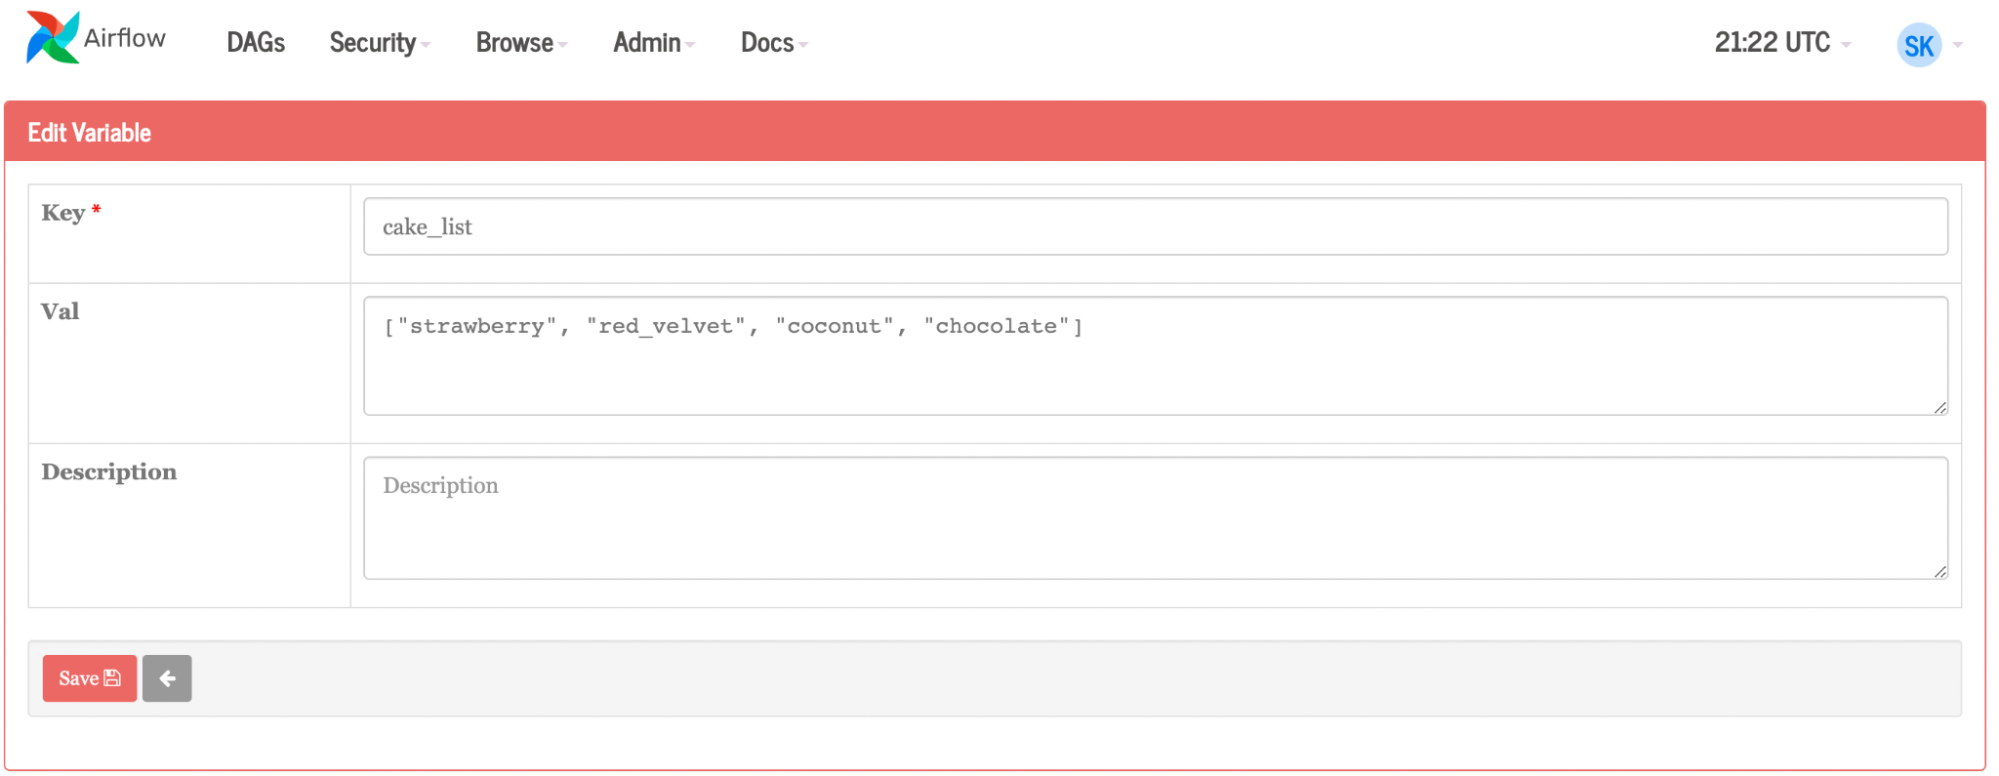
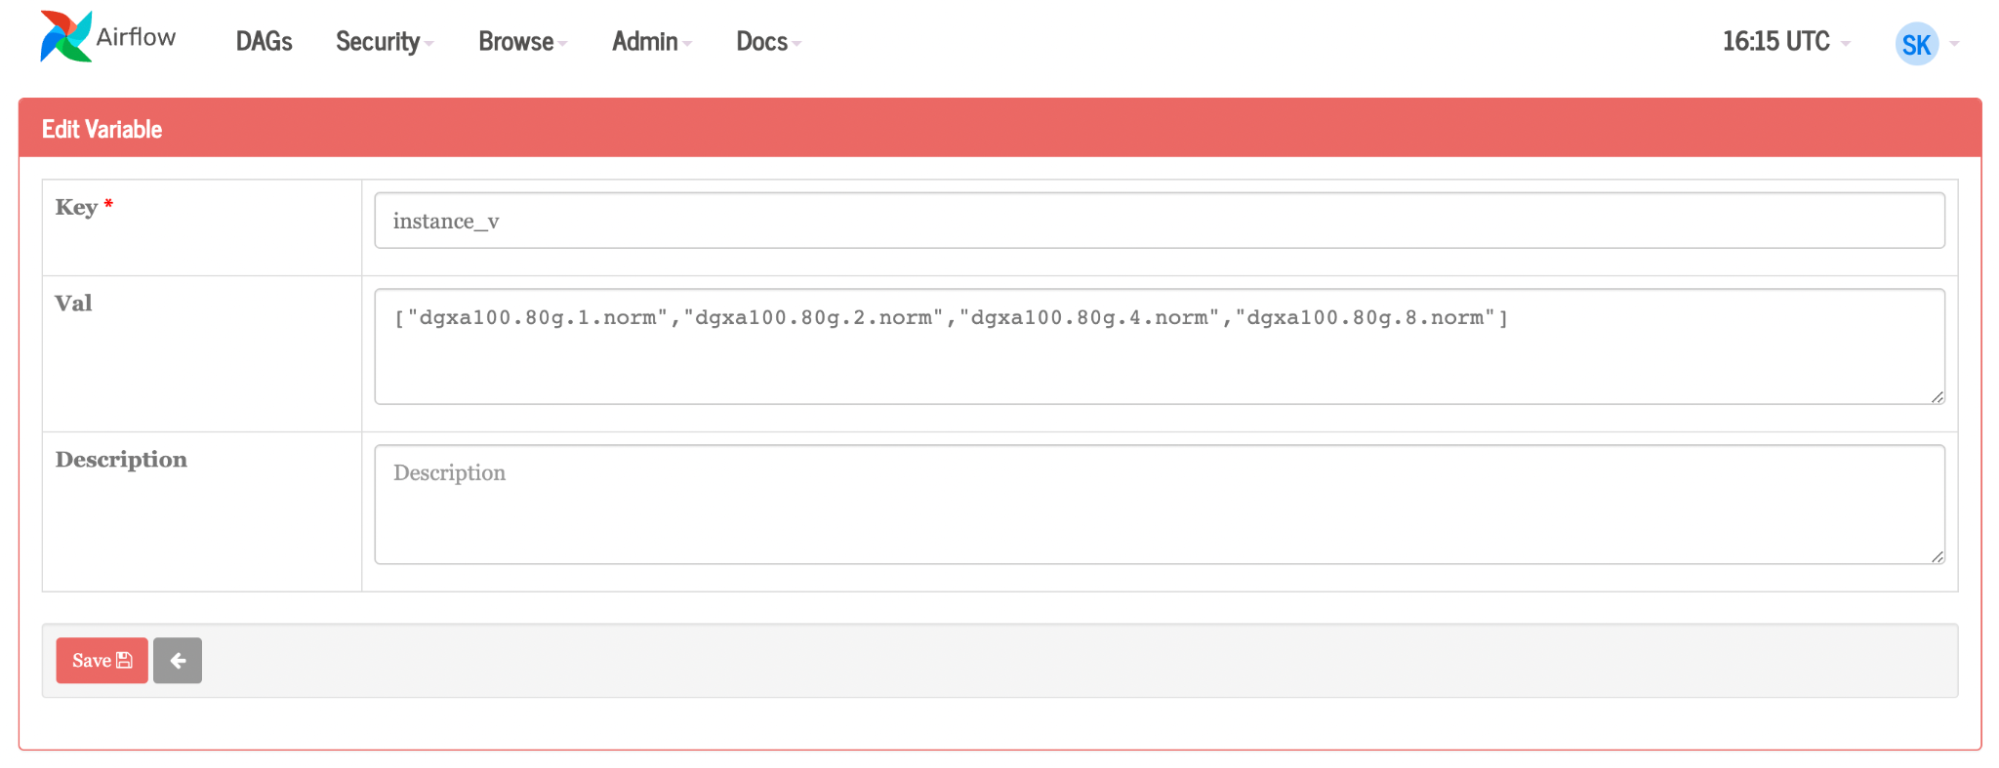
繼續以蛋糕為例,假設你打算做一個巧克力蛋糕,但后來決定開一家面包店。您可以為 Airflow 提供一個蛋糕列表,而不是為每個單獨的蛋糕手動創建任務:草莓、椰子和紅絲絨(圖 5 )。您可以通過 UI 或上傳 JSON 文件來完成此操作。氣流將動態地再創造三個工作崗位,再制造三種蛋糕口味,而不是為每種新的蛋糕口味手動重新創建過程。如果有人對椰子過敏,你可以把它從名單上刪除。或者你可以有一個本周的風格,并通過編程每周更改變量(蛋糕口味)。
如果您將這種方法應用于 ML 管道,您可以想象所有這些都可以實現。作為更大管道的一部分,更新可以是程序化的和自動化的。結合更復雜的基本命令作業,例如運行一些框架,每個容器可能只更改一個簡單變量或一組變量,然后比較所有不同作業運行的結果以做出決定。
然后,可以根據結果對氣流進行配置,以啟動額外的多節點訓練,或者可以將獲勝模型上傳到專用注冊表,并將進一步的工作負載或任務與 Fleet Command 集成,將其投入生產。
如何使用氣流
首先,確保您已經擁有一個 Kubernetes 環境,并且已經安裝了 Helm。Helm 是 Kubentes 的包管理器,可以用于查找、共享和使用軟件。如果您正在使用 Mac 電腦,可以使用 Homebrew 來安裝 Helm 。
helm repo add apache-airflow https://airflow.apache.org
helm repo update
kubectl create namespace airflow
helm upgrade --install airflow apache-airflow/airflow --namespace airflow --debug
接下來,為 Web 服務器生成一個秘密:
Generate Secret for UX
python3 -c 'import secrets; print(secrets.token_hex(16))'
helm show values apache-airflow/airflow > values.yaml
Open the file
When inside file, change: ‘webserverSecretKey: <secret_key>’
helm upgrade --install airflow apache-airflow/airflow -n airflow -f values.yaml --debug
氣流將 DAG 存儲在本地文件系統中。在 GitHub 存儲庫中保存 DAG 是一種更可擴展、更簡單的方法。 Airflow 在文件系統中檢查新的/更新的 DAG ,但使用 GitSync , Airflow 會查看更容易維護和更改的 GitHub 存儲庫。
接下來,配置 GitSync 。將密鑰添加到 GitHub 存儲庫時,請確保啟用寫入訪問。
ssh-keygen -t ed25519 -C “airflow-git-ssh”
  When asked where to save, press enter
  When asked for a passcode, press enter (do NOT put in a passcode, it will break)
Copy/Paste public key into private github repository
Repository > settings > deploy key > new key
kubectl create secret generic airflow-git-ssh \
 --from-file=gitSshKey=/Users/skropp/.ssh/id_ed25519 \
 --from-file=known_hosts=/Users/skropp/.ssh/known_hosts \
 --from-file=id_ed25519.pub=/Users/skropp/.ssh/id_ed25519.pub \
 -n airflow
edit values.yaml (see below)
helm upgrade --install airflow apache-airflow/airflow -n airflow -f values.yaml —-debug
原件:
gitSync:
 enabled: false
 # git repo clone url
 # ssh examples ssh://git@github.com/apache/airflow.git
 # https example: https://github.com/apache/airflow.git
 repo: https://github.com/apache/airflow.git
 branch: v2-2-stable
 rev: HEAD
 depth: 1
 # the number of consecutive failures allowed before aborting
 maxFailures: 0
 # subpath within the repo where dags are located
 # should be "" if dags are at repo root
 subPath: "tests/dags"
 # if your repo needs a user name password
 # you can load them to a k8s secret like the one below
 # ___
 # apiVersion: vI
 # kind: Secret
 # metadata:
 #    name: git-credentials
 # data:
 #    GIT_SYNC_USERNAME: <base64_encoded_git_username>
 #    GIT_SYNC_PASSWORD: <base64_encoded_git_gat)words
 # and specify the name of the secret below
 # credentialsSecret: git-credentials
 # If you are using an ssh clone url, you can load
 # the ssh private key to a k8s secret like the one below
 # ___
 # apiVersion: vI
 # kind: Secret
 # metadata;
 #    name: airflow-ssh-secret
 # data:
 #    key needs to be gitSshKey
 #    gitSshKey: <base64_encoded_data>
 # and specify the name of the secret below
 # sshKeySecret: airflow-ssh-secret
隨著變化:
gitSync:
 enabled: True
 # git repo clone url
 # ssh examples ssh://git@github.com/apache/airflow.git
 # https example: https://github.com/apache/airflow.git
 repo: ssh://git@github.com/sushi-sauce/airflow.git
 branch: main
 rev: HEAD
 depth: 1
 # the number of consecutive failures allowed before aborting
 maxFailures: 0
 # subpath within the repo where dags are located
 # should be "" if dags are at repo root
 subPath: ""
 # if your repo needs a user name password
 # you can load them to a k8s secret like the one below
 # ___
 # apiVersion: v1
 # kind: Secret
 # metadata:
 # name: git-credentials
 # data:
 # GIT_SYNC_USERNAME: <base64_encoded_git_usernames
 # GIT_SYNC_PASSWORD: <base64_encoded_git_password>
 # and specify the name of the secret below
 credentialsSecret: git-credentials
 # If you are using an ssh clone url, you can load
 # the ssh private key to a k8s secret like the one below
 # ___
 # apiVersion: v1
 # kind: Secret
 # metadata:
 # name: airflow-ssh-secret
 # data:
 # key needs to be gitSshKey
 # gitSshKey: <base64_encoded_data>
 # and specify the name of the secret below
sshKeySecret: airflow-git-ssh
現在, Airflow 正在運行,并且有一個存儲 DAG 文件的地方。
DAG 示例
下面,找到一個簡單的 DAG 示例,以及一個更復雜的示例。
DAG 的簡單示例
下面顯示了一個非常簡單的 DAG :
- 第 1-3 行導入運行任務所需的各種工具和運算符。
- 第 5-6 行創建了一個 Python 函數,用于打印一條消息。
- 第 8-10 行定義 DAG ,給出顯示名稱
hello_world以及描述,以及時間表間隔和開始日期。計劃間隔和開始日期是必需的配置。 - 第 12 行定義了任務,
task_id命名任務, Python 可調用調用函數,dag=DAG引入了上面設置的配置。
1 from datetime import datetime
2 from airflow import DAG
3 from airflow.operators.python_operator import PythonOperator
4
5 def print_hello():
6 return 'Hello world from first Airflow DAG!'
7
8 dag = DAG('hello_world', description='Hello World DAG',
9		schedule interval='0 12 * * *',
10 	 	start_date=datetime (2017, 3, 20), catchup=False)
11
12 hello_operator = PythonOperator (task_id-'hello_task', python_callable=print_hello, dag=dag)
13
14 hello_operator
更復雜的 DAG 示例
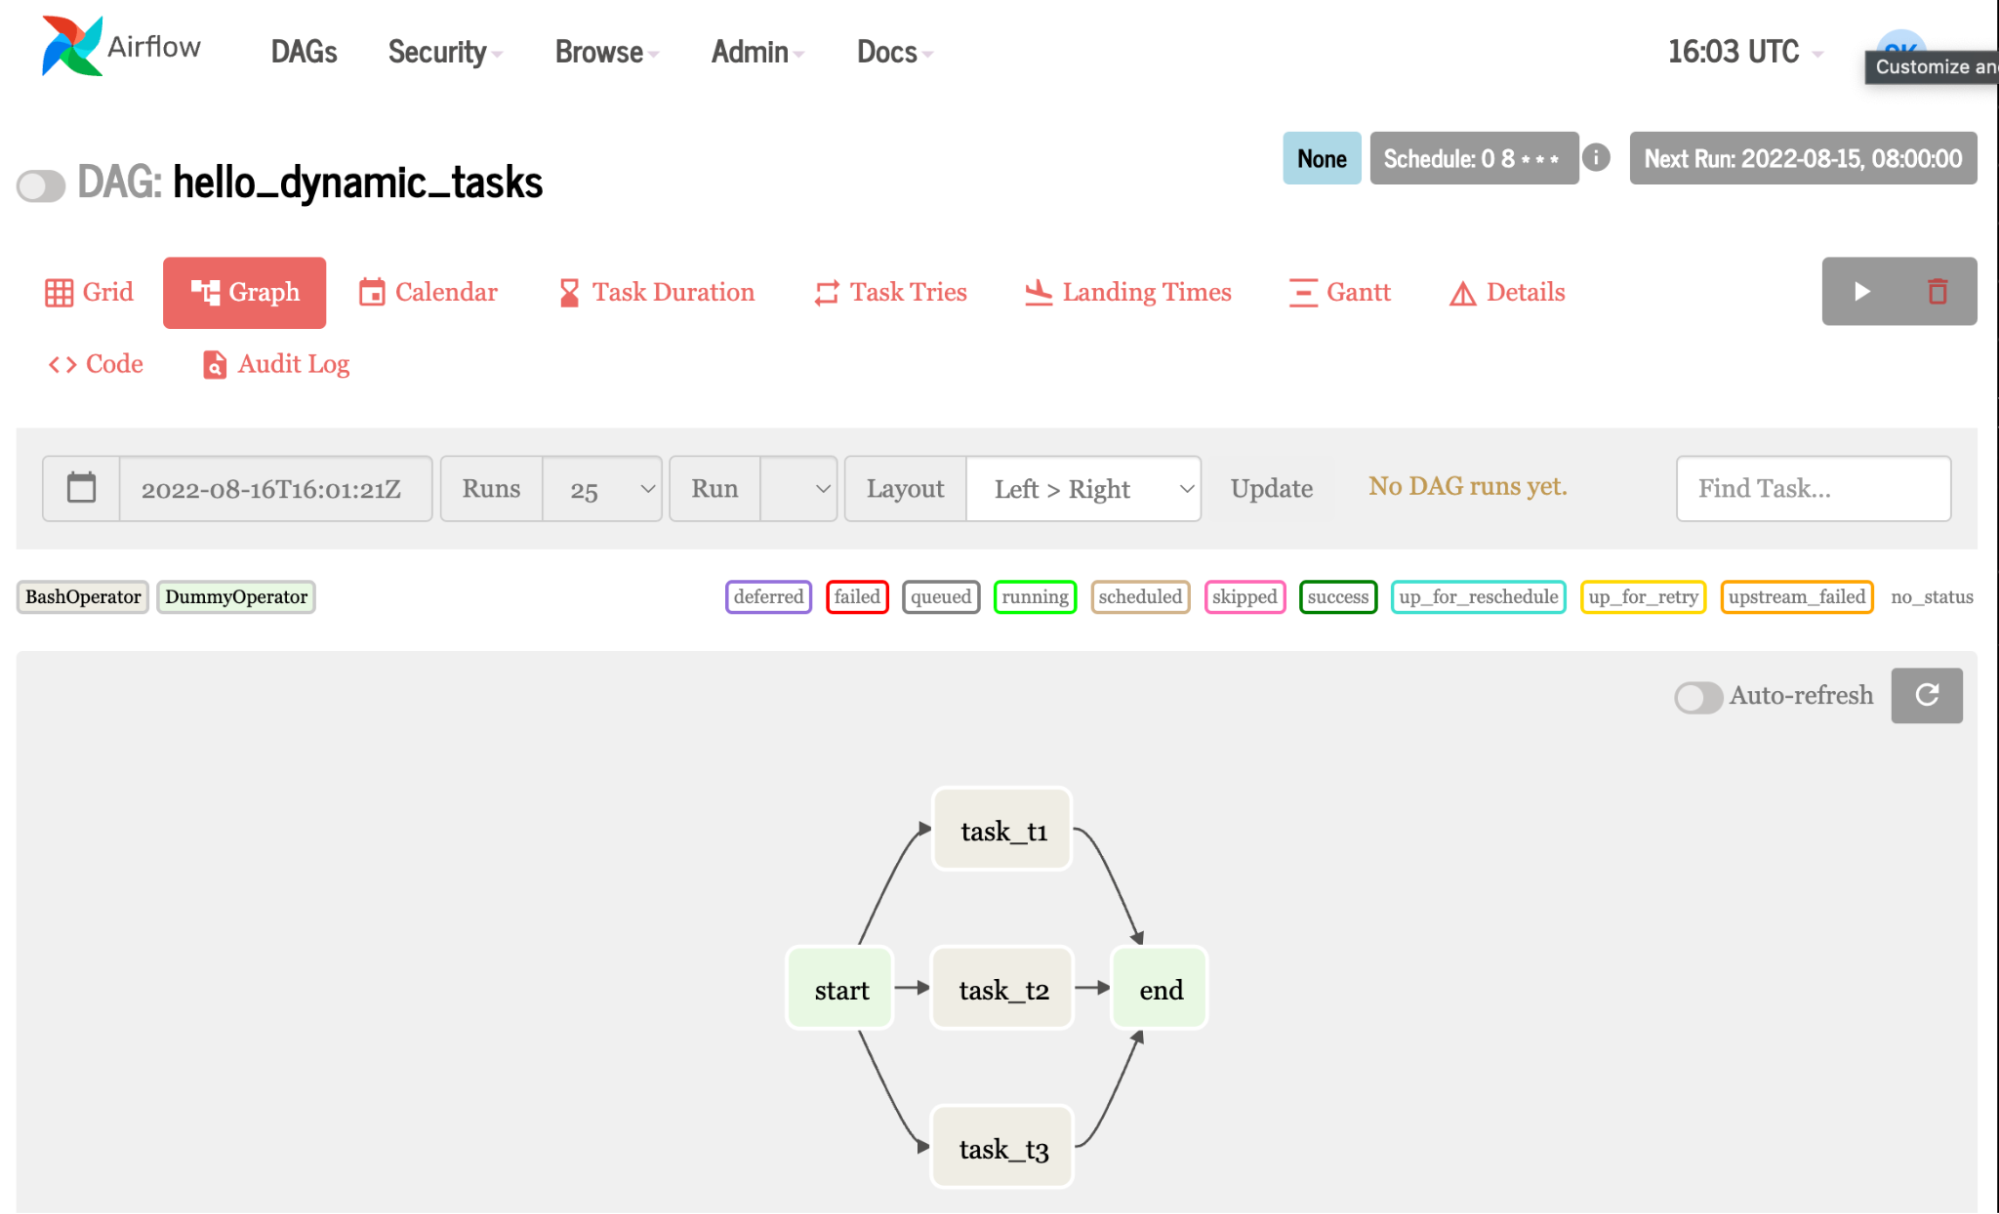
本例創建同一個任務三次,與任務 1 、 2 和 3 中的 hello 相呼應。當您在循環中使用變量列表而不是簡單的數字時,它會變得有趣。這意味著你可以? 更改代碼片段以動態地創建不同的作業。
1 from airflow import DAG
2 from airflow.operators.bash_operator import BashOperator
3 from airflow.operators. dummy_operator import DummyOperator
4 from datetime import datetime, timedelta
5
6 # Step 1 - Define the default arguments for DAG
7 default_args = {
8 	'depends_on_past': False,
9 	'start_date': datetime (2020, 12, 18),
10 	'retry_delay': timedelta(minutes=5)
11 }
12
13 # Step 2 - Declare a DAG with default arguments
14 dag = DAG( 'hello_dynamic_tasks',
15 	schedule_interval='0 8 * * *'
16 	default_args=default_args,
17 	catchup=False
18 	)
19 # Step 3 - Declare dummy start and stop tasks
20 start_task = DummyOperator(task_id='start', dag=dag)
21 end_task = DummyOperator (task_id='end', dag=dag)
22
23 # Step 4 - Create dynamic tasks for a range of numbers
24 for 1 in range(1, 4):
25 	# Step 4a - Declare the task
26 	t1 = BashOperator (
27 		task_id='task_t' + str(i),
28 		bash _command='echo hello from task: '+str(i),
29		dag=dag
30 	)
31 # Step 4b - Define the sequence of execution of tasks
32 start_task ?> t1 >> end_task
雖然與第一個示例類似,但此示例使用占位符運算符創建空任務,并使用循環創建動態任務。
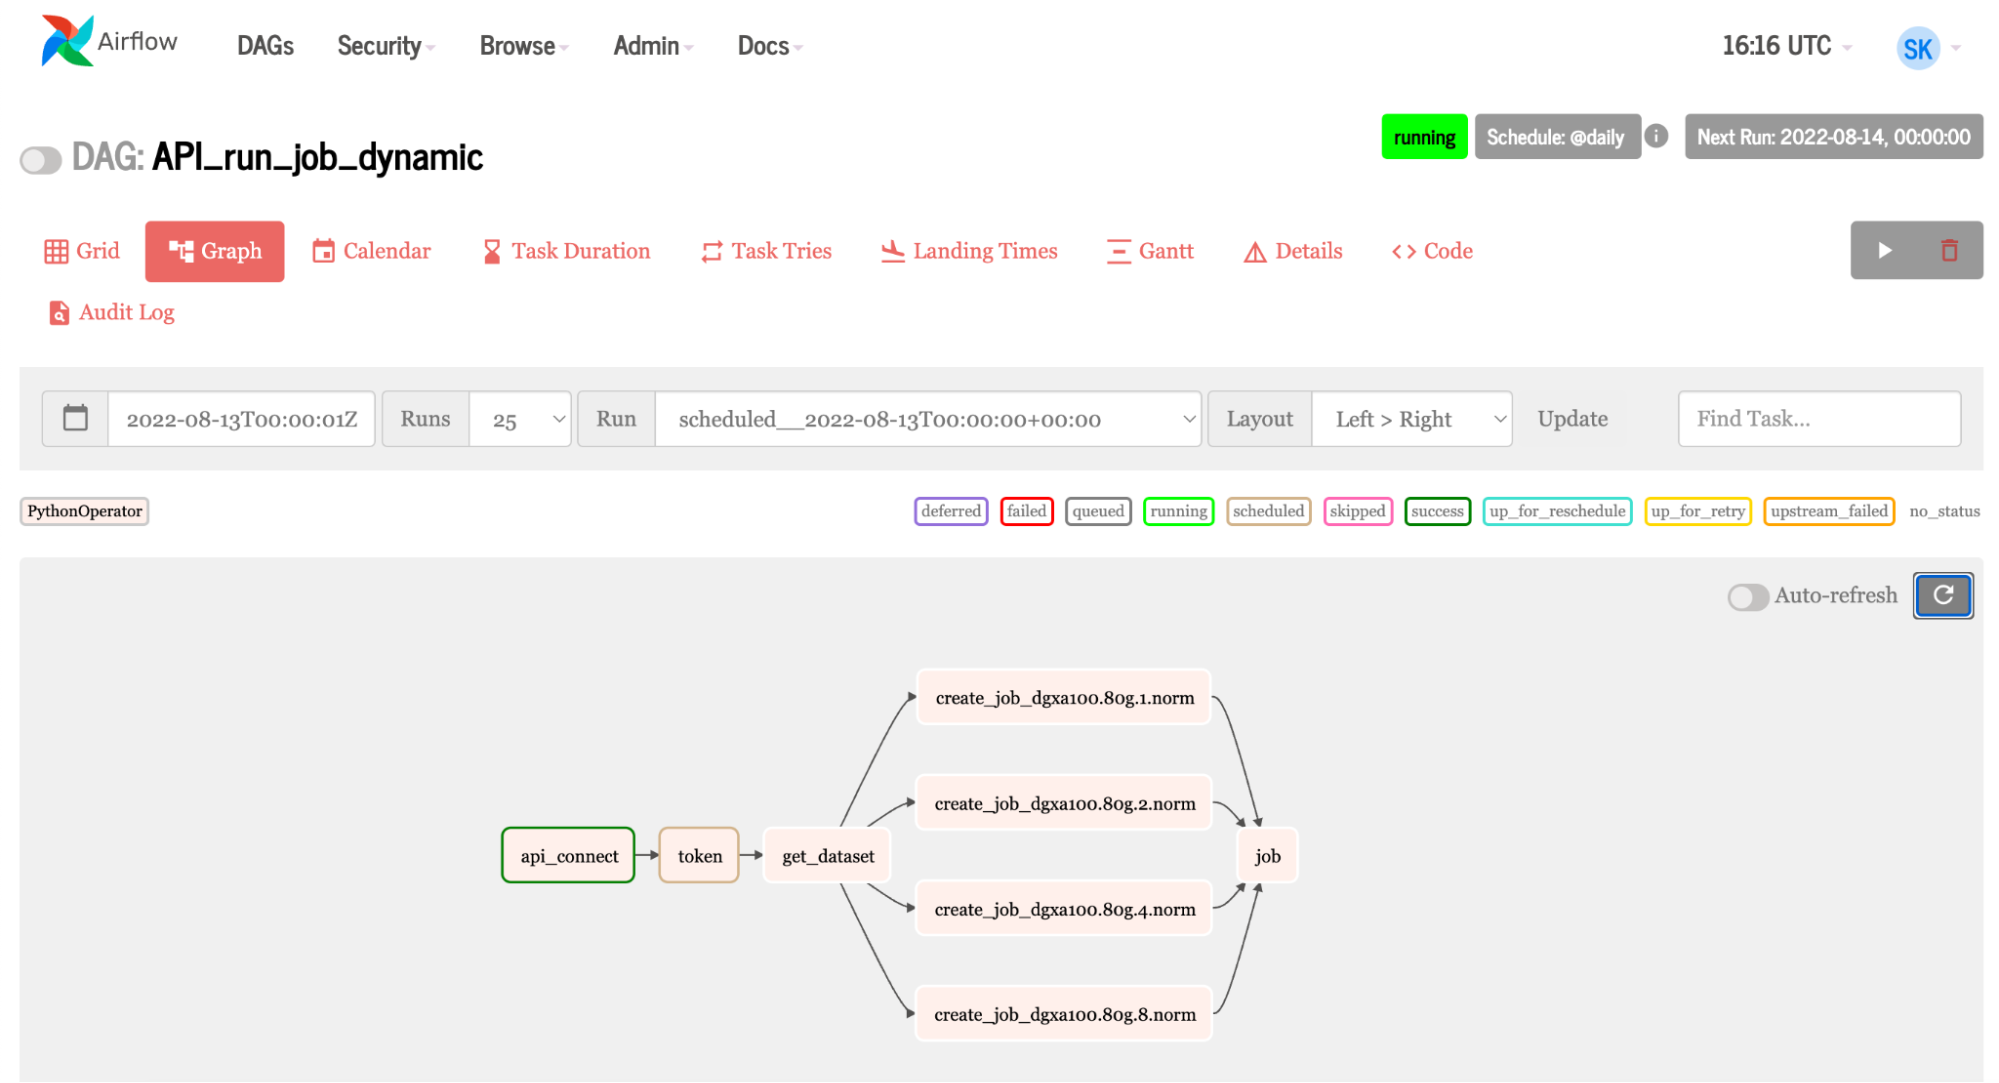
帶有 NVIDIA 基本命令的 DAG 示例
氣流可以利用基本指令 API 。 Fleet Command 使用相同的 API 。這使 Airflow 能夠使用許多 NVIDIA AI 平臺,使加速的 AI 管道易于使用 Airflow 進行管理。讓我們瀏覽一下 Airflow 中的一些代碼,其中顯示了連接到基本命令并運行作業所需的任務。
t1= PythonOperator(
task_id = 'api_connect'
python_callable= find_api_key,
dag = dag,
)
t2 = PythonOperator (
task_id = 'token',
python_callable = get_token,
op_kwargs=("org":org_, "team": team_),
dag = dag
)
t3 = PythonOperator (
task_id = 'get_dataset',
op kwargs=("org":org_),
python_callable = get_datasets,
dag = dag
)

t5 = PythonOperator(
task_id = 'job',
python_callable run_job,
dag = dag
)

for element in instance_v:
t4 = PythonOperator (
task_id = 'create_job_' + str(element),
op_kwargs={"org":org_. ,"team": team_, "ace": ace_, "name": name_, "command": command_ , "container": container_, "instance": str(element))},
python_callable=create_job,
dag = dag
)

t1 >> t2 >> t3 >> t4 >> t5

Key functions being used in the tasks include:

def find_api_key(ti):
        expanded_conf_file_path = os.path.expanduser("~/.ngc/config")
        if os.path.exists(expanded_conf_file_path):
            print("Config file exists, pulling API key from it")
            try:
                config_file = open(expanded_conf_file_path, "r")
                lines = config_file.readlines()
                for line in lines:
                 if "apikey" in line:
                    elements = line.split()
                    return elements[-1]

            except:
                print("Failed to find the API key in config file")
                return ''
        elif os.environ.get('API_KEY'):
            print("Using API_KEY environment variable")
            return os.environ.get('API_KEY')

        else:
            print("Could not find a valid API key")
            return ''

def get_token(ti, org,team ):
        api = ti.xcom_pull(task_ids='api_connect')
        '''Use the api key set environment variable to generate auth token'''
        scope_list = []
        scope = f'group/ngc:{org}'
        scope_list.append(scope)
        if team:
            team_scope = f'group/ngc:{org}/{team}'
            scope_list.append(team_scope)

        querystring = {"service": "ngc", "scope": scope_list}

 auth = '$oauthtoken:{0}'.format(api)
        auth = base64.b64encode(auth.encode('utf-8')).decode('utf-8')
        headers = {
          'Authorization': f'Basic {auth}',
          'Content-Type': 'application/json',
          'Cache-Control': 'no-cache',
        }
        url = 'https://authn.nvidia.com/token'
        response = requests.request("GET", url, headers=headers, params=querystring)
        if response.status_code != 200:
            raise Exception("HTTP Error %d: from %s" % (response.status_code, url))

        return json.loads(response.text.encode('utf8'))["token"]
- 任務 1使用 DAG 中定義的 Python 函數查找 API 密鑰。
- 任務 2獲得代幣;這里發生了兩件非常有趣的事情:
- 要獲得令牌,需要將密鑰交給 API 。任務 1 找到密鑰,但在 Airflow 中,所有任務都是單獨的。(注意,我使用了
xcom中的功能get_token將任務 1 的結果拉入任務 2 中。xcom提取函數中的 API 密鑰find_api_key進入get_token以生成令牌。) - 組織和團隊參數是 Airflow 變量。這意味著你可以進入 Airflow UI ,根據使用它的人更改憑據。這使得更改用戶變得簡單明了。
- 要獲得令牌,需要將密鑰交給 API 。任務 1 找到密鑰,但在 Airflow 中,所有任務都是單獨的。(注意,我使用了
- 任務 3獲取作業所需的數據集。類似地,它使用在 Airflow UI 中定義的組織變量。
- 任務 4是主角。對于實例列表中的每個圖元, Airflow 都會創建一個作業。變量還用于團隊、組織、容器、名稱、命令和實例。如果要更改這些組件中的任何一個,請在 Airflow 內部的變量頁面上進行更改。
- 任務 5運行作業。
結論
將 Apache Airflow 等工作流管理工具集成到數據管道中對于高效管理和執行復雜任務至關重要。隨著人工智能在各個行業的快速采用,將人工智能任務集成到現有工作流程中的需求變得越來越重要。
將 Airflow 與利用 GPU 加速的 NVIDIA Base Command 等人工智能平臺集成,簡化了人工智能模型的訓練和部署過程。 Airflow 的自動化和靈活性,再加上通過 Base Command Platform 提供的 NVIDIA 計算能力,使您能夠在 ML 管道中進行高效的實驗、模型比較和決策。
最終產品是管理良好、速度更快的工作流程。 Base Command Platform 和 Airflow 共同使組織能夠優化數據管道,增強不同團隊之間的協作,并促進將加速的人工智能集成到現有工作流程中。這導致更快的人工智能開發和部署,更有效、更可擴展、更可靠。
想要了解更多信息,請觀看 NVIDIA Base Command 演示視頻。并查看相關帖子,如何使用 NVIDIA Base Command 平臺簡化 AI 開發。
?