Torch TensorRT 是 PyTorch 與 NVIDIA TensorRT 的新集成,它用一行代碼加速推理。我對 Torch TensorRT 感到興奮。 PyTorch 是當今領先的深度學習框架,在全球擁有數百萬用戶。 TensorRT 是一個 SDK ,用于在數據中心運行的 GPU 加速平臺上進行高性能、深度學習推理,嵌入式、嵌入式和汽車設備。這種集成通過使用 TensorRT 時簡化的工作流程,使 PyTorch 用戶具有極高的推理性能。
什么是 Torch-TensorRT
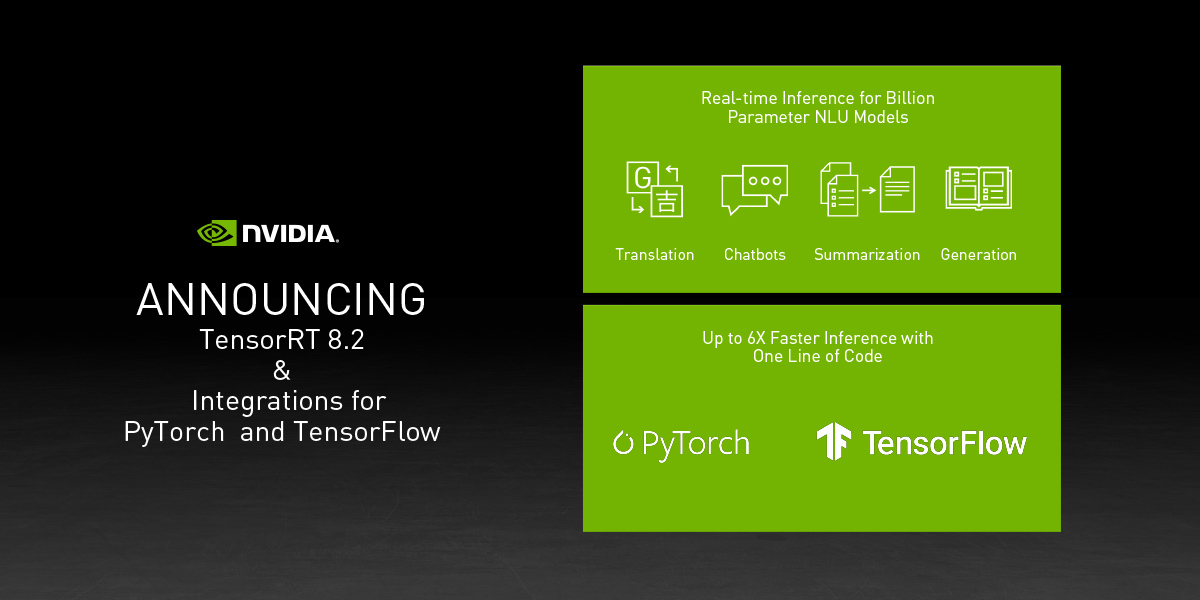
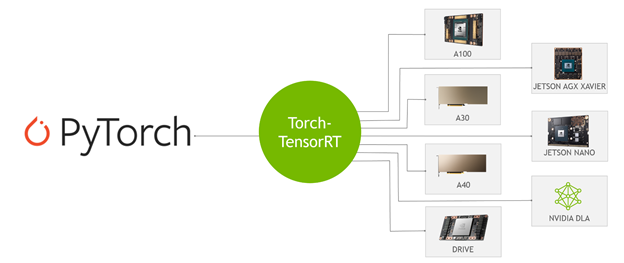
Torch-TensorRT 是 PyTorch 的集成,它利用了 TensorRT 在 NVIDIA GPU 上的推理優化。只需一行代碼,它就提供了一個簡單的 API ,在 NVIDIA GPU 上可以提供高達 6 倍的性能加速。
這種集成利用了 TensorRT 優化,例如 FP16 和 INT8 降低的精度,同時在 TensorRT 不支持模型子圖時提供了對本機 PyTorch 的回退。
Torch-TensorRT 的工作原理
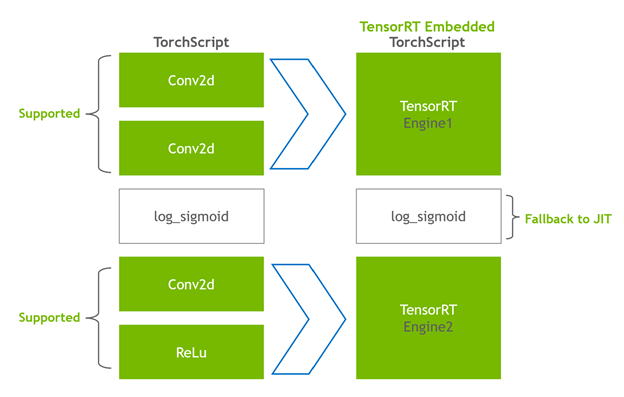
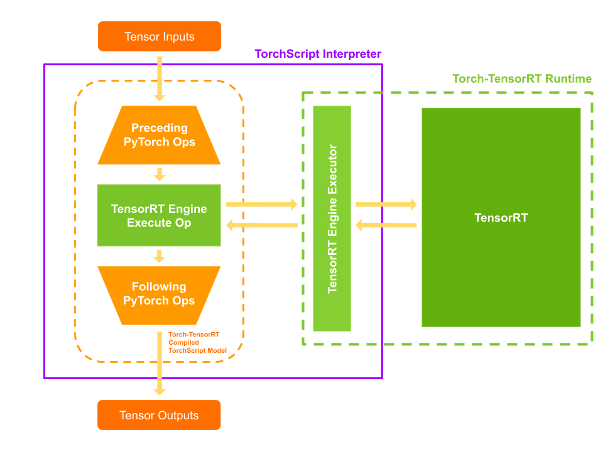
Torch- TensorRT 充當TorchScript的擴展。它優化并執行兼容的子圖,讓 PyTorch 執行其余的圖。PyTorch的全面而靈活的功能集與Torch- TensorRT 一起使用,Torch- TensorRT 解析模型并對圖中與TensorRT兼容的部分應用優化。
編譯后,使用優化的圖形就像運行 TorchScript 模塊,用戶可以獲得更好的 TensorRT 性能。 Torch- TensorRT 編譯器的體系結構由兼容子圖的三個階段組成:
- 降低 TorchScript 模塊
- 轉變
- 處決
降低 TorchScript 模塊
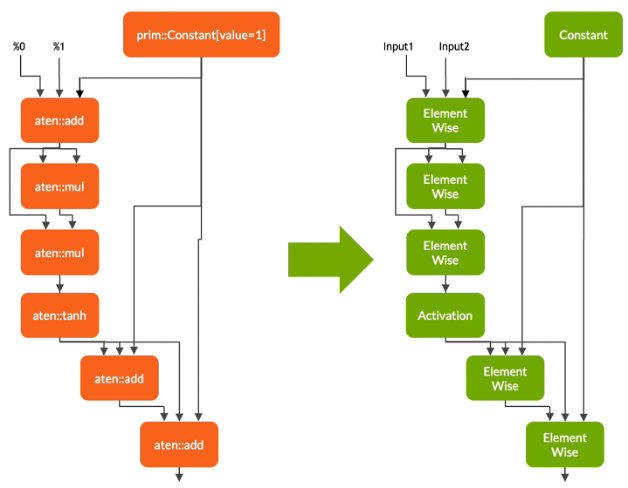
在第一階段, Torch- TensorRT 降低了 TorchScript 模塊,將常見操作的實現簡化為更直接映射到 TensorRT 的表示。請務必注意,此降低過程不會影響圖形本身的功能。

轉變
在轉換階段, Torch- TensorRT 自動識別 TensorRT 兼容的子圖,并將其轉換為 TensorRT 操作:
- 具有靜態值的節點將被計算并映射到常量。
- 描述張量計算的節點轉換為一個或多個 TensorRT 層。
- 其余節點保留在 TorchScript 中,形成一個混合圖,作為標準 TorchScript 模塊返回。
修改后的模塊會隨 TensorRT 引擎一起返回給您,這意味著整個模型 – PyTorch 代碼、模型重量和 TensorRT 引擎都可以在單個包中進行移植。
處決
當您執行編譯后的模塊時, Torch- TensorRT 會將引擎設置為活動并準備好執行。當您執行這個修改后的 TorchScript 模塊時, TorchScript 解釋器調用 TensorRT 引擎并傳遞所有輸入。引擎運行并將結果推回解釋器,就像它是正常的 TorchScript 模塊一樣。
Torch-TensorRT 特征
Torch- TensorRT 介紹了以下特性:支持 INT8 和稀疏性。
對 INT8 的支持
Torch-TensorRT 通過兩種技術擴展了對低精度推斷的支持:
- 培訓后量化( PTQ )
- 量化感知訓練( QAT )
對于 PTQ , TensorRT 使用校準步驟,該步驟使用來自目標域的樣本數據執行模型。它跟蹤 FP32 中的激活,以校準到 INT8 的映射,從而最大限度地減少 FP32 和 INT8 推理之間的信息損失。 TensorRT 應用程序要求您編寫一個校準器類,為 TensorRT 校準器提供樣本數據。
Torch- TensorRT 使用 PyTorch 中的現有基礎設施,使校準器的實施更加容易。 LibTorch 提供了一個 DataLoader 和 datasetapi ,它簡化了輸入數據的預處理和批處理。這些 API 通過 C ++和 Python 接口公開,使您更容易使用 PTQ 。有關更多信息,請參閱 培訓后量化( PTQ ) 。
對于 QAT , TensorRT 引入了新的 API :QuantizeLayer和DequantizeLayer,它們將 PyTorch 中的量化相關操作映射到 TensorRT 。類似于aten::fake_quantize_per_*_affine的操作在內部通過 Torch- TensorRT 轉換為QuantizeLayer + DequantizeLayer。有關使用 Torch TensorRT 優化 Pytork 的 QAT 技術訓練的模型的更多信息,請參閱 使用 Torch TensorRT 在 INT8 中部署量化感知訓練模型 。
稀疏
NVIDIA 安培結構 在 NVIDIA 引入了第三代張量核 A100 GPU 使用網絡權重中的細粒度稀疏性。它們提供了最大的密集數學吞吐量,同時又不犧牲作為深度學習核心的矩陣乘法累積作業的準確性。
- TensorRT 支持在這些張量核上注冊和執行一些稀疏層的深度學習模型。
- Torch- TensorRT 擴展了對卷積和完全連接層的支持。
示例:圖像分類的吞吐量比較
在本文中,您將通過名為 EfficientNet 的圖像分類模型執行推斷,并在 PyTorch 、 TorchScript JIT 和 Torch TensorRT 導出和優化模型時計算吞吐量。有關更多信息,請參閱 Torch-TensorRT GitHub 存儲庫上的端到端示例筆記本。
安裝和先決條件
要執行這些步驟,您需要以下資源:
- 具有 NVIDIA GPU 、 compute architecture 7 或更早版本的 Linux 計算機
- 已安裝 Docker , 19.03 或更早版本
- 一個 Docker 容器,包含 PyTorch 、 Torch TensorRT 和從 NGC Catalog 中提取的所有依賴項
按照說明運行標記為 nvcr.io/nvidia/pytorch:21.11-py3 的 Docker 容器。
現在 Docker 容器中有了一個 live bash 終端,啟動一個 JupyterLab 實例來運行 Python 代碼。在端口 8888 上啟動 JupyterLab 并將令牌設置為TensorRT。將系統的 IP 地址放在手邊,以便在瀏覽器上訪問 JupyterLab 的圖形用戶界面。
Jupyter lab --allow-root --IP=0.0.0.0 --NotebookApp.token=’TensorRT’ --port 8888
使用端口 8888 在瀏覽器上導航到此 IP 地址。如果您正在運行此本地系統示例,請導航到Localhost:8888。
在瀏覽器上連接到 JupyterLab 的圖形用戶界面后,可以創建新的 Jupyter 筆記本。首先安裝 timm ,這是一個 PyTorch 庫,其中包含預訓練的計算機視覺模型、權重和腳本。從該庫中提取EfficientNet-b0模型。
pip install timm
導入相關庫并為nn.Module創建 PyTorch nn.Module對象。
import torch
import torch_tensorrt
import timm
import time
import numpy as np
import torch.backends.cudnn as cudnn torch.hub._validate_not_a_forked_repo=lambda a,b,c: True efficientnet_b0 = timm.create_model('efficientnet_b0',pretrained=True)
通過將隨機浮點數張量傳遞給efficientnet_b0對象的forward方法,可以從該模型獲得預測。
model = efficientnet_b0.eval().to("cuda")
detections_batch = model(torch.randn(128, 3, 224, 224).to("cuda"))
detections_batch.shape
這將返回一個[1281000]的張量,對應于 128 個樣本和 1000 個類。
要通過 PyTorch JIT 和 Torch- TensorRT AOT 編譯方法對該模型進行基準測試,請編寫一個簡單的基準測試實用程序函數:
cudnn.benchmark = True def benchmark(model, input_shape=(1024, 3, 512, 512), dtype='fp32', nwarmup=50, nruns=1000): input_data = torch.randn(input_shape) input_data = input_data.to("cuda") if dtype=='fp16': input_data = input_data.half() print("Warm up ...") with torch.no_grad(): for _ in range(nwarmup): features = model(input_data) torch.cuda.synchronize() print("Start timing ...") timings = [] with torch.no_grad(): for i in range(1, nruns+1): start_time = time.time() pred_loc = model(input_data) torch.cuda.synchronize() end_time = time.time() timings.append(end_time - start_time) if i%10==0: print('Iteration %d/%d, avg batch time %.2f ms'%(i, nruns, np.mean(timings)*1000)) print("Input shape:", input_data.size()) print('Average throughput: %.2f images/second'%(input_shape[0]/np.mean(timings)))
現在可以對該模型執行推斷了。
使用 PyTorch 和 TorchScript 進行推理
首先,采用 PyTorch 模型,計算批量為 1 的平均吞吐量:
model = efficientnet_b0.eval().to("cuda")
benchmark(model, input_shape=(1, 3, 224, 224), nruns=100)
可以對 TorchScript JIT 模塊重復相同的步驟:
traced_model = torch.jit.trace(model, torch.randn((1,3,224,224)).to("cuda")])
torch.jit.save(traced_model, "efficientnet_b0_traced.jit.pt")
benchmark(traced_model, input_shape=(1, 3, 224, 224), nruns=100)
PyTorch 和 TorchScript JIT 報告的平均吞吐量類似。
用 Torch-TensorRT 進行推理
要使用 Torch- TensorRT 以混合精度編譯模型,請運行以下命令:
trt_model = torch_tensorrt.compile(model, inputs= [torch_tensorrt.Input((1, 3, 224, 224))], enabled_precisions= { torch_tensorrt.dtype.half} # Run with FP16
)
最后,對 Torch- TensorRT 優化模型進行基準測試:
benchmark(trt_model, input_shape=(1, 3, 224, 224), nruns=100, dtype="fp16")
基準結果
以下是我在批量為 1 的 NVIDIA A100 GPU 上獲得的結果。

總結
只需一行優化代碼, Torch- TensorRT 即可將模型性能提高到 6 倍。它確保了 NVIDIA GPU 的最高性能,同時保持了 PyTorch 的易用性和靈活性。
有興趣在你的模型上試一試嗎?從 PyTorch NGC 容器下載 Torch- TensorRT ,以通過 TensorRT 優化加速 PyTorch 推理,且無需更改代碼。
?